
Keeping the garden a manageable and enjoyable place to grow and eat from can be an overwhelming task or one you feel like you won’t be able to leave for any time without coming back to dead plants. For many, the most important task and often the most daily task is watering. This is why having the option to reduce the amount of worry or concern can be a vital element to garden success. Here in Alaska, there are so few summer days that being tied down and unable to explore our great outdoors can often deter some from growing a garden where there might be times daily tasks would need to be skipped or done by someone else. One option for a successful garden that allows for more freedom and less watering worry is the self-watering/wicking raised bed system.
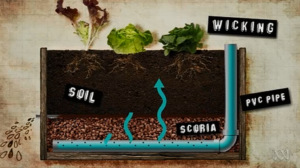
Self-watering or wicking raised beds are one that works on the same principle as water traveling up a paper towel that has been dipped in water on one side. The water capillaries are able to slowly saturate the soil above it to ensure that plant roots are getting the ideal amount needed for healthy growth. This means that for watering, you will not need to be out there daily once the soil is consistently damp. A wicking raised bed is also an ideal option if you will be transplanting in your plants rather than starting from seed, but it still will need to be watched for the first few days to ensure health.
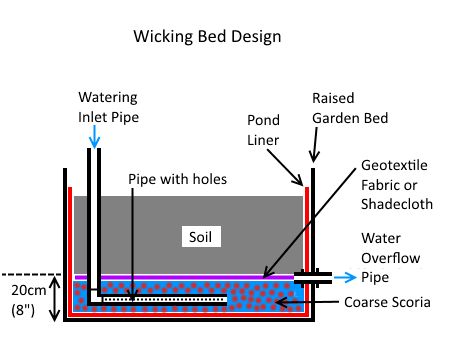
This diagram shows the parts of a wicking bed and how you would water it to keep it going over the summer. Another great feature of this kind of garden bed is that over-watering or getting too much rain is not nearly as large of a concern as the drainage hole will make sure.
How to build the wicking raised bed:
- Utilizing your main body material (either wood or another kind of container) for the raised bed, ensure that it is on level ground and that it is free of any rough areas that might rip the plastic lining.
- Line the entire inside with a waterproof barrier. especially if using a wooden raised bed.
- The ideal soil depth will be about 30 cm or 11.81 ins, so you will want to mark out the rest of the depth of your bed that will be filled with either rocks, clay balls, or coarse scoria. Once marked, make a drainage hole just under that mark so that excess water can be removed.
- You will then insert your drainage pipe or valve into this hole and ensure a tightly sealed fit, so water does not get between the liner and the bed.
- Fill the area of the bottom halfway and then lay in your PVC pipe with holes drilled in the middle of the area with the inlet pipe near the edge. You will want to make sure to keep the pipe in place as you finish filling in the rest of the needed rocks and leveling it out.
- Place your matting down that will divide the soil and the rocks but still allow for the passage of water, such as shade cloth.
- Now fill the rest of the way to the top with soil while ensuring not to get any into your water inlet pipe.
- You are now ready to start adding in plants. Fill your box with water from the inlet pipe until you see water come out of the overflow pipe, and continue to do so until you feel the soil damp at the top at least 2 ins down. Water plants from above until wicking process has fully worked.
For an older version of how this bed can be built out of wood, this is the link to that video: https://www.abc.net.au/gardening/how-to/building-a-wicking-bed/9435452?utm_campaign=abc_gardening&utm_content=link&utm_medium=content_shared&utm_source=abc_gardening
This is a multi-linked bed option with schematics: https://medium.com/sustainability-x/how-to-build-a-self-watering-garden-1398f320ba1f


Comments are closed